![ITONICS-Logo-Night-Blue-2021.svg]](https://www.itonics-innovation.com/hubfs/ITONICS-Logo-Night-Blue-2021.svg)
Note that the Workspace Configuration feature is part of our Professional offering. It is not available out of the box and needs to be enabled for your organization. Contact us at account_manager@itonics-innovation.com to enable it for you!
- Workspace configuration — overview
- General Settings — name, description, and workspace access
- Users — who has access to the workspace
- Roles — the roles available in the workspace
- Permissions — what each role can do
- Element types — the content structure of the workspace
- Folders and views — configuring the workspace structure
1. Workspace configuration — overview
Your Innovation OS is designed to engage multiple teams and stakeholders with different interests on one single source of truth. Workspaces thus allow you to provide each of these groups with different (content) interests in their own home. In the following, we describe the 5 key characteristics of workspaces:
- Workspace creation: System administrators can create and manage different workspaces for different use cases.
- Same tools, different content, configuration, and users: Per workspace, all the tools will be accessible that you have licensed. The only differences may be the configuration, content, and users living in the workspaces. However, content can also easily be copied from one workspace into another workspace.
- Access rights: It is possible to grant everyone in your Innovation OS access to a workspace (i.e., public workspace) or restrict the visibility of a workspace only to some users (private workspace). It is also possible to grant different roles and permissions in different workspaces to the same user.
- Tailor the Element Configuration to the needs of a workspace: After the workspace creation, workspace administrators will be able to adjust the element types by adding or hiding properties, group fields, and element types. This way, the ITONICS blueprint element types and properties can be modified. Workspace administrators can also create custom element types and properties.
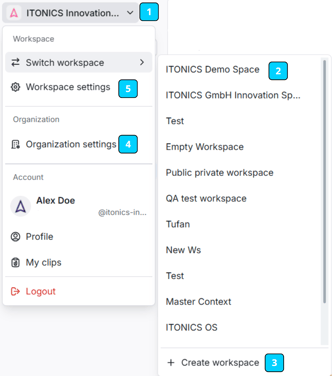
The workspace — that a user is currently in — is always displayed at the top left corner of the system [1]. By clicking on it, a user can "Switch workspace" to another [2], a click on a workspace name will take a user to another workspace. System administrators will also see the option to "+Create workspace" at the bottom of the list [3].
System administrators can find the "Organization settings" option [4] in the top left menu after clicking on the workspace name. Upon opening the settings, opening the Workspaces page in the sidebar shows the list of all workspaces and the option to add or adjust them.
Workspace administrator and system administrators also have the option to open the Workspace settings [5] for the workspace they are currently in directly. The settings open in a window over your Innovation OS, and from the sidebar you can change the visibility, name, the workspace users and their roles, and manage the workspace’s element types.
System administrators can create a workspace from the Workspaces page of the organization settings, which lists every workspace in the organization together with the option to add a new one.
Once they start the setup of a new workspace, a popup appears. At the bottom of the pop-up, they can select the element types that should become part of this workspace.
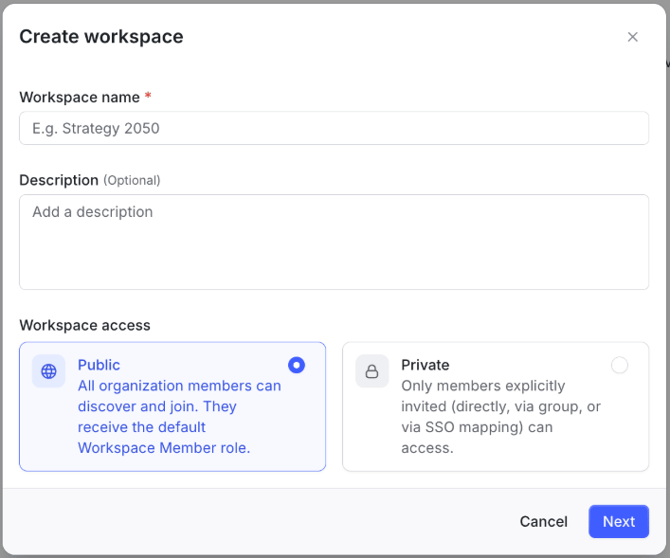
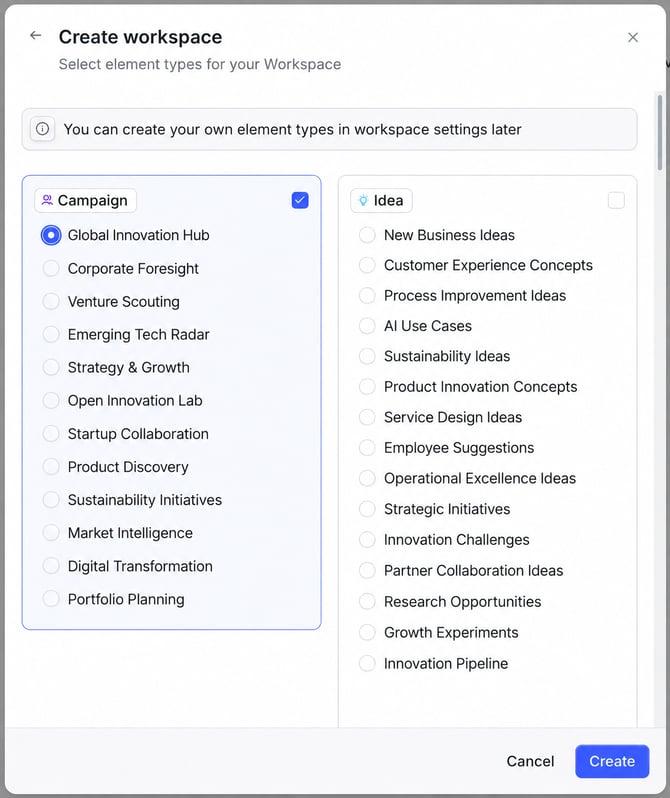
As described above, you need to open the settings of the respective workspace first. You can do this when you create a new workspace from the Workspaces page of the organization settings, or — as a workspace admin — from the workspace settings of the workspace you are currently in [5].
When you open the Workspaces page of the organization settings, you will first find a list of all the workspaces within your organization. From this list you can open a workspace to change it, and you will also find the option to create a new workspace.
As a Workspace Administrator, you can change the name and description of your workspace, define its visibility, manage the user list, and manage the element types used in your workspace.
2. General Settings — name, description, and workspace access
The workspace settings open on General Settings, where you can change the Workspace name and add an optional Description.
When creating a workspace, the second thing that should be done (after giving it a name) is to decide who should be part of it and in what role. It is the decision whether the workspace should be public, i.e., open to all the users within your Innovation OS, or whether it should be private. In a private workspace, only members who are explicitly invited — directly, or via SSO mapping — can access it.
Note that private workspaces are only part of our professional offering. It is not available out of the box and needs to be enabled for your organization.
Contact us at account_manager@itonics.de to enable it for you!
On the same page you find Workspace access. Choose Public — all organization members can discover and join the workspace, and they receive its default role — or Private, where only members who are explicitly invited (directly, via a group, or via SSO mapping) can access it. Click Update to apply the change.
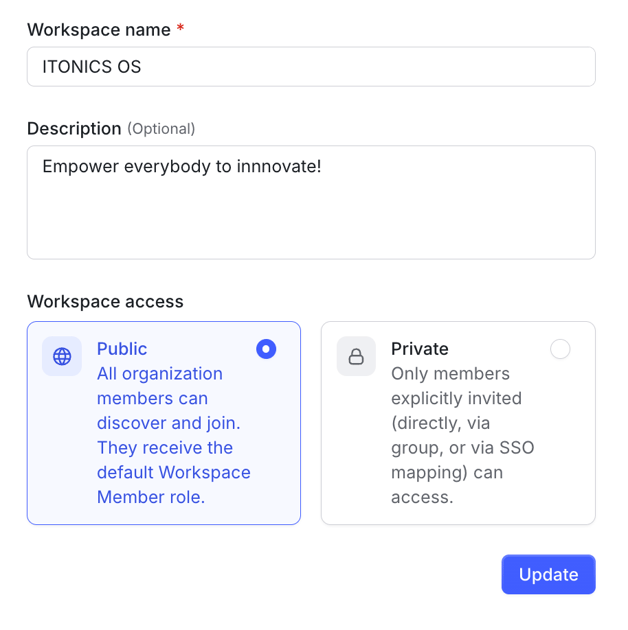
Please pay attention to the following notes:
- Changing a workspace to public
- Changing the visibility settings of a workspace from private to public needs to be done by the Application Admin. Changing it this way will expose all content to all users who are part of the entire Innovation OS. All users who are already in the workspace, stay in the workspace and keep their user roles.
- Changing a workspace to private
- Changing the visibility settings of a workspace from public to private will mean that only users with adjusted roles keep access to the workspace. All users with no adjusted roles will lose access. If you want to keep a viewer as a viewer in the system, you need to manually add the user with this respective role.
- The default setting is public
- If you create a new workspace, it is a public workspace by default. This is also indicated in the visibility column in the workspace settings menu [7].
- The default user role is the system default role
- In a public workspace, all users of the organization are automatically assigned to the default role of the system, i.e. Viewer. Yet, you can change the role individually.
- Only users with changed roles are listed in the user list of a public workspace
- Newly invited users to your organization have automatic access to all public workspaces and will have the default role assigned to them. Yet, you can assign roles to users that are different from the default role of the system. Only the users with a role that is different from the default are listed. This is also indicated by a label saying "Everyone at [Organization Name] can access this workspace as [default role]".
- To add a user to a private workspace, they need to be first a part/a user of the entire Innovation OS. Once they are users in your organization, you have to assign a role for this specific workspace to the users. The default role of your organization does not have any effect. The default role only applies in private workspaces if the Application Admin invites new users to the organization and assigns them to a workspace directly.All users have to be added manually to a private workspace.
3. Users — who has access to the workspace
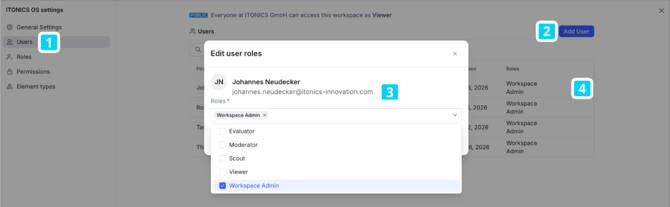
To assign a user role or change it to something else than the default role, open the workspace settings and go to Users [1]in the sidebar.
The Users page lists everyone in the workspace with their first name, last name, email address, the date they were added, when they were last seen, and their roles. Use the search field, Sort by and Filter to find a specific person. To add a colleague to the workspace, click Add User [2].
A popup opens from which you can search for the users being members of your Innovation OS. Find the respective colleagues (multiple selection is possible) and assign the workspace-specific role that you want to provide them with [3]. To change the role a user already has, open the actions menu at the end of that user’s row in the list. Three dots will appear on hover [4].
4. Roles — the roles available in the workspace
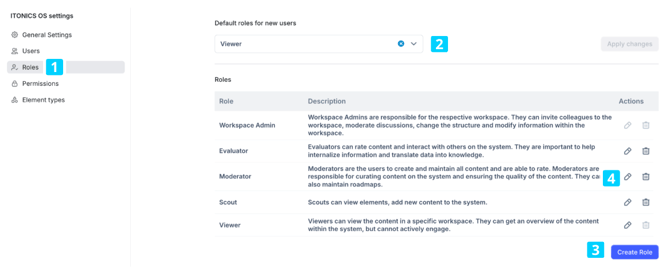
The Roles [1] page lists the roles available in this workspace — Workspace Admin, Evaluator, Moderator, Scout and Viewer are available by default, each with a short description of what it is for. At the top you can set the Default roles for new users [2] and confirm with Apply changes; at the bottom, Create Role [3] lets you add a role of your own. Existing roles can be edited or deleted from the Actions column [4]. What each of these roles is actually allowed to do is set on the Permissions page, and described in detail under roles and permissions per workspace.
5. Permissions — what each role can do
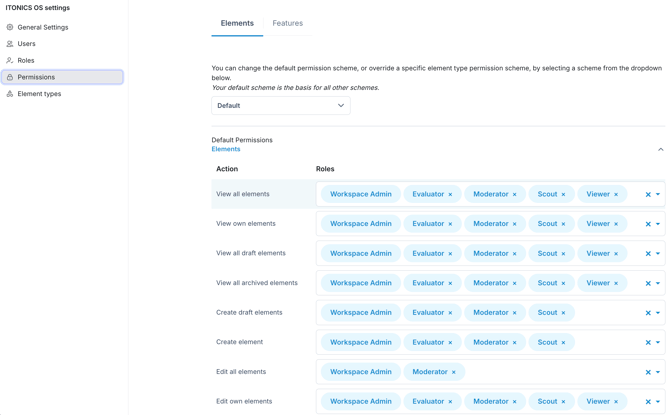
The Permissions page is where you decide what each role may actually do, split across an Elements and a Features tab. Select a scheme from the dropdown to change the default permission scheme or to override the scheme of a specific element type — your default scheme is the basis for all other schemes. For each action, such as viewing, creating or editing elements, you then assign the roles that are allowed to perform it. Read more about roles and permissions per workspace.
6. Element types — the content structure of the workspace
Once your workspace is created, the workspace administrator can further adjust and create the element types and properties it uses.
To do so, open the workspace settings from the left side nav and go to Element types in the sidebar.
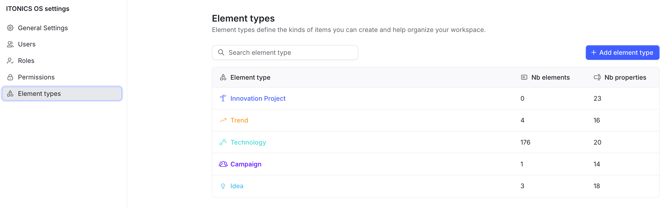
The Element types page lists every element type in the workspace, together with the number of elements and the number of properties each one uses. From here you can add an element type, open one to change its name, color, icon, description and tabs, and configure the layout of its detail page.
Those steps are the same wherever you open an element type, so they are described in full in the dedicated article: Element Configuration (EC) — Structuring Content via Element Types.
Note
- Deactivation only works for empty element types.
- You can only deactivate an element type if there is no content entered for this element type in the workspace, and if changes to the element type in this workspace have been reverted (see 5.). If you want to deactivate, you must first delete all elements of that type from the workspace in Explorer.
- Values in hidden properties are not lost.
- Hiding a property after values have been added (e.g. you have added the segmentation "Economical" to a trend in Explorer) will not delete those values. Instead, when deciding to display the property again, those values will just show up again.
- The ITONICS Showroom Workspace cannot be changed at all.
- Limitations to properties
- Minimum and maximum values for number and numerical rating properties cannot be made more restrictive due to migration issues of existing user ratings. They can be made less restrictive, however.
7. Folders and views — configuring the workspace structure
 The real work gets done inside the different workspace views and folders.
Different to other innovation platforms, the ITONICS Innovation OS transitioned to a use case based navigation structure with customizable folders and views.
This navigation allows for grouping content on a use case basis into folders and not having to rely on an old, cumbersome navigation structure.
Easy, fast and efficient.
See in the picture on the right how a use case based navigation structure could look like.
Structuring views
The navigation is fully customizable, after adding a folder or a view of any kind (Radar, Matrix, Board, List, Grid, etc.) via the plus icon in the top right of the image, use drag-and-drop to place the view according to your needs.
Setting a landing page
The first view in the navigation is set to be the default landing view for all users accessing the workspace via the default workspace link.
Note that, if the first view in the navigation, is a folder, the first view in the folder will be the landing page.